MAGNETIC SAFETY LOCKS
How to Install in Under 60 Seconds
TIPS FOR A TROUBLE-FREE INSTALL
- No tools are required to install our Locks, just peel and stick (although we do provide optional screws and screw holes if you prefer that method).
- Clean and fully dry the surface where the lock and latch will be installed. Without doing this the Adhesive will not stick as strong.
- The key part is to position the Latch & Lock correctly (see picture). Our QuickFit tool makes it easy for you to position the locks in exactly the right position.
- Do not disassemble the QuickFit installation tool as the hinge is fragile and may break.
STEP 1: POSITION THE QUICKFIT INSTALLATION TOOL
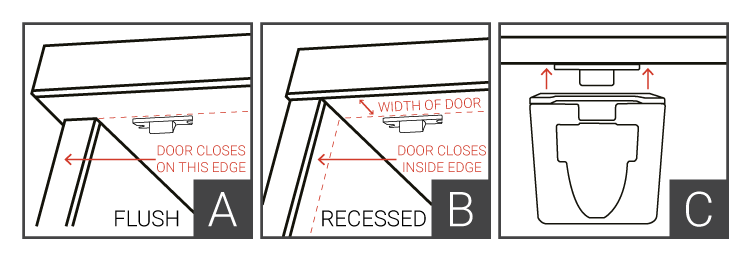
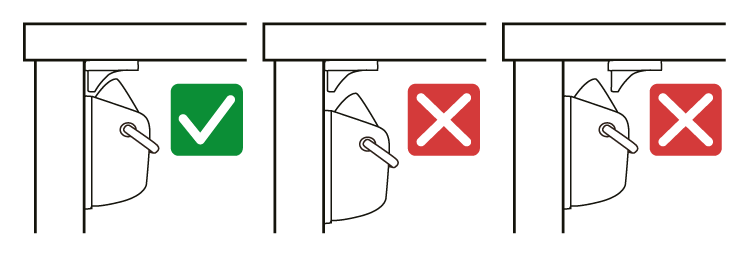
- Position the Latch at the point where the door/drawer closes. This will depend on whether the door/drawer closes flush or is recessed.
- Flush: Position Latch in line with the panel the door/drawer closes flush to. (A)
- Recessed: You also need to allow for the width of the door/drawer. (B)
- Remove the adhesive backing paper and press firmly to position the latch in place.
- Now, temporarily remove the adhesive backing paper from the QuickFit tool.
- Position the QuickFit installation tool over the latch and lightly stick the tool in place. The latch fits into the top portion of the installation tool. (C)
STEP 2: STICK THE LOCK
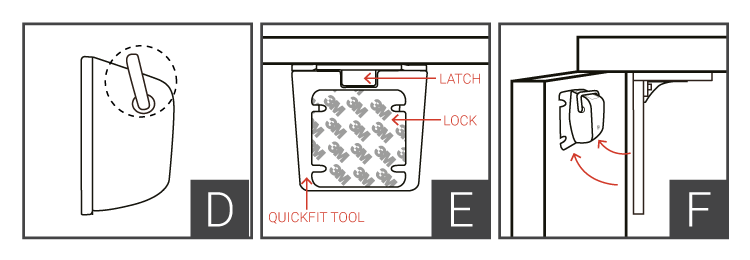
- Place the override handle on the lock in the upright (unlocked) position. (D)
- Remove the backing paper of the 3M adhesive on the rear of the lock.
- Place the lock into the QuickFit installation tool. It will only fit one way and will support itself. (E)
- Gently close the door/drawer so that it makes contact with adhesive on the Lock.
- Now, gently re-open the door/drawer and the lock will come away from the installation tool and perfectly in position on the door/drawer. (F)
- Firmly press and hold on the Lock and Latch for 15 - 30 seconds to ensure the adhesive pad gets a good strong grip on the surface.
STEP 3: REMOVE QUICKFIT TOOL & TEST THE LOCK
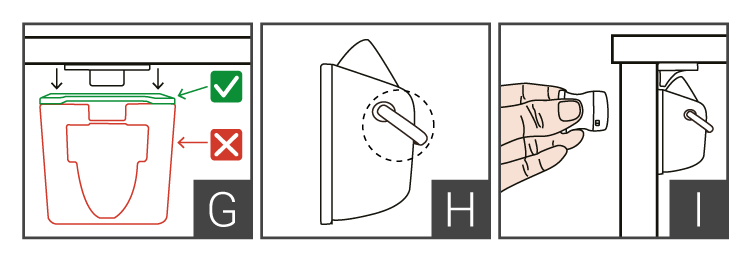
- Remove the QuickFit tool by gently pulling the top (latch) part. Be gentle, the tool is fragile, don’t pull the bottom (lock) part as you could break the hinge. (G)
- Position the override handle in the bottom position to enable the lock. (H)
- Close the door and gently test that the door is now locked.
- Remove the key holder from the key (you can stick the key holder in a raised place where your child cannot reach for a safe place to store the key)
- Move the key towards the door/drawer (where you positioned the lock) and you will hear it unlocking. (I)
IMPORTANT
Once you have gently tested the lock, you must wait 48 hours for full adhesion before putting the lock into full-time use. Simply position the override handle in the unlocked (upper) position so you can continue to use your doors / drawers.
IMPORTANT SAFETY ADVICE
- Keep the magnetic key out of the reach of children.
- These Safety Locks do not substitute the need for adult supervision and are designed only to help minimize accidents.
- Keep small parts away from children.
- Do not use this product to guard against toxic substances or dangerous objects.
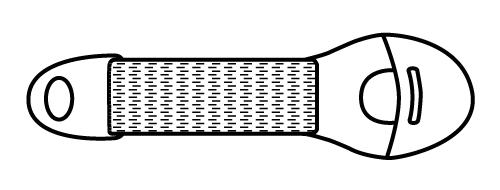
BONUS STRAP LOCKS
Included in your box are three bonus strap locks that can be used to lock your oven, fridge, microwave or pretty much anything else you want to stop your child having access to.
They are easy to install. Simply remove the backing paper on the 3M Adhesive strips and stick the larger end on the door to be secured and the smaller end on an adjacent surface. To open just press the button with the arrow on it to detach the lock.
ANY PROBLEMS? WE’RE WAITING TO HELP...
CONTACT SUPPORT
Looking for the installation demo video? Sorry, we are busy making an updated version of our installation video which will be live on this page soon. If you still have questions after reading the instructions above then please contact our support team and we'll be more than happy to help you further.